
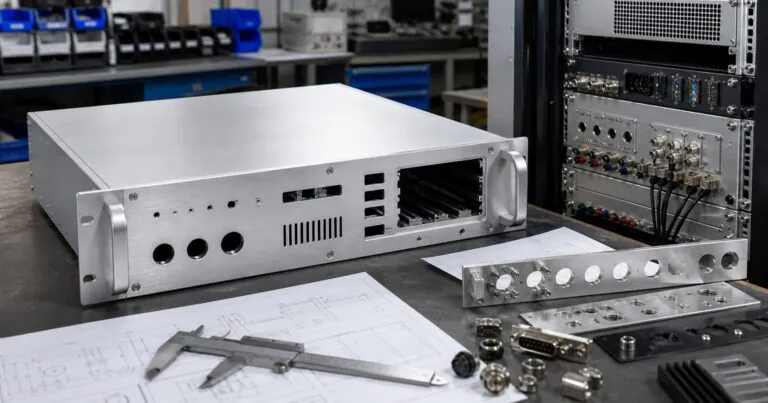
19 Inch Rackmount Chassis Customization: Engineering Checklist for OEM Electronics
A 19 inch rackmount chassis looks simple from the outside: a front panel, rack ears, a metal body, and enough space for electronics. In real OEM projects, however, the chassis controls much more than appearance. It affects rack fit, connector access, airflow, PCB support, transformer mounting, cable routing, serviceability, branding, and long-term production consistency.
For communication devices, test instruments, power supplies, control modules, and amplifier systems, the rackmount chassis often becomes the mechanical interface between the electronic design and the end user's installation environment. If the chassis is specified too late, the project may face avoidable sample revisions, delayed assembly, thermal problems, or poor front panel alignment.
This checklist explains how hardware engineers and procurement teams can define a custom 19 inch rackmount chassis before requesting a quotation from a manufacturer.
Start with the Rack Format, Not Only the Outer Size
The phrase "19 inch rackmount chassis" refers to a standardized mounting format, not simply the external width of a box. Rackmount equipment normally uses front mounting ears and panel dimensions based on the 482.6 mm, or 19 inch, equipment system. Height is commonly described in rack units: 1U, 2U, 3U, 4U, and higher.
For an RFQ, define at least four basic dimensions:
| Parameter | Why it matters |
|---|---|
| Rack height | Confirms 1U, 2U, 3U, or custom height and affects cooling space. |
| Usable internal width | Confirms PCB, transformer, heat sink, and bracket clearance. |
| Chassis depth | Controls cable clearance, power supply position, and rack installation. |
| Front panel thickness | Affects strength, appearance, countersinking, and connector mounting. |
The most common mistake is sending only the front panel size without defining internal clearance. A deep connector, power inlet, fan, heat sink, or cable bend radius can require more depth than the PCB itself.
Choose Aluminum, Steel, or a Hybrid Structure
Rackmount chassis can be made from aluminum, steel, or a combination of both. For many PUMAYCASE projects, aluminum is preferred because it is lighter, corrosion resistant, easy to machine, and suitable for anodizing, brushing, and precision front panel work.
Aluminum for Custom Rackmount Chassis
Aluminum is practical for instrument chassis, audio equipment, communication modules, and industrial control devices. It supports clean CNC cutouts, attractive anodized finishes, and good thermal conductivity. Aluminum is also useful when buyers need customized panels in small to medium batches.
Typical choices include:
- 6063 aluminum: Good for extrusion profiles, clean surface finish, and decorative anodizing.
- 6061 aluminum: Stronger and more suitable for machined structural parts, brackets, and applications requiring higher mechanical strength.
Steel for Strength and Shielding
Steel may be selected for heavy-duty internal frames, transformer support, or applications where rigidity and electromagnetic shielding are more important than weight. However, steel usually requires painting, plating, or powder coating to control corrosion and appearance.
Hybrid Design
A practical OEM solution can combine an aluminum front panel with a steel internal base or bracket. This gives the buyer a professional front appearance while maintaining structural support for heavy components.
Define the Front Panel Before CNC Machining
The front panel is where engineering and branding meet. It must hold displays, switches, connectors, LEDs, handles, labels, ventilation slots, and sometimes a logo. A good front panel drawing should remove all guesswork.
Send these details before production:
- 2D drawing in DXF, DWG, or PDF
- Hole center coordinates from a fixed datum
- Connector datasheets or exact part numbers
- Panel thickness and countersink requirements
- Corner radius for rectangular cutouts
- Surface finish and color
- Logo method: laser marking, silk screen, engraving, or printing
For CNC machining, small details can decide sample success. A rectangular connector opening should include corner radius requirements because a milling cutter cannot produce a perfectly sharp internal corner. If the connector has a flange, define whether the cutout should clear the body only or include the mounting flange.
Plan Rear Panel and Cable Clearance
The rear panel often receives less attention than the front panel, but it is critical for system integration. Power inlets, network connectors, terminal blocks, antenna ports, ground studs, and fan outlets are usually placed at the rear.
A good rear panel design considers:
- Cable bend radius behind the rack
- AC power inlet clearance
- Fan exhaust direction
- Grounding point position
- Label visibility
- Distance between high-voltage and signal connectors
- Service access after installation
For dense rack installations, rear cable congestion can become a real field issue. Procurement teams should confirm the buyer's rack depth and cable management method before freezing the chassis depth.
Solve Thermal Management Early
Thermal design is one of the most common hidden risks in rackmount electronics. A 1U chassis may look efficient, but it leaves limited internal height for heat sinks, fans, and airflow channels. A 2U or 3U design may cost slightly more in material, but can reduce thermal risk and improve service life.
Passive Cooling
Passive cooling works best when the heat load is moderate and the chassis can transfer heat through aluminum surfaces. Useful design options include:
- Thicker aluminum base plate
- Side or top ventilation slots
- Direct contact between hot components and aluminum walls
- Heat spreader plates
- External heat sink profiles
Forced Air Cooling
Forced air is often required for power supplies, edge computing devices, amplifiers, and high-density communication modules. Define airflow direction before panel machining. Many rack systems use front-to-rear airflow, but industrial and audio projects may use side ventilation, rear exhaust, or local fan cooling.
Important details include fan size, airflow direction, filter requirement, noise limit, and whether the fan can be replaced without removing the full unit from the rack.
Confirm Internal Mounting and Load Support
The internal structure must support the electronics during assembly, shipping, and field use. A front panel alone should not carry heavy components.
Common internal features include:
- PCB standoffs
- Sliding card guides
- L-shaped brackets
- Cross beams
- Transformer mounting plates
- Heat sink brackets
- Cable tie holes
- Grounding studs
For power supplies and amplifier chassis, heavy transformers or heat sinks should be mounted to a reinforced base or bracket. For test instruments and control devices, PCB mounting points should match the board drawing and leave enough clearance for solder joints, component height, and wiring.
Specify Rack Ears, Handles, and Rails
Rack ears define how the chassis attaches to the rack. Handles make installation easier, especially for deeper or heavier units. Rails or rear support brackets may be needed when the chassis is heavy or frequently serviced.
For quotation, specify:
| Feature | Recommended information |
|---|---|
| Rack ears | Fixed or removable, thickness, hole pattern, finish |
| Handles | Front handles, rear handles, load expectation |
| Rails | Required or not required, rack depth, service pull-out need |
| Rear support | Needed for heavy chassis, transformers, or long-depth units |
If the unit is deep, heavy, or installed in mobile equipment, front mounting alone may not be enough. Rear support reduces stress on the front panel and rack ears.
Choose the Surface Finish for Function and Brand Consistency
Surface finish is not only cosmetic. It affects corrosion resistance, scratch visibility, color consistency, and perceived product quality.
Common choices include:
- Clear anodizing: Clean technical look, good for instruments and communication devices.
- Black anodizing: Popular for audio, test equipment, and professional electronics.
- Brushed anodizing: Premium appearance, often used for amplifier front panels.
- Powder coating: Good color coverage and corrosion protection, useful for steel or mixed-material chassis.
- Silk screen printing: Suitable for labels, port names, and logos.
- Laser marking: Durable and precise, especially on anodized aluminum.
Buyers should define whether appearance must match previous batches. For repeat orders, a golden sample and approved color reference help reduce disputes.
Prepare a Complete RFQ Package
A complete RFQ saves time and improves quotation accuracy. Instead of asking only for a price, send the information needed to confirm manufacturability.
Recommended RFQ Checklist
- Target rack height: 1U, 2U, 3U, or custom
- Overall width, height, and depth
- Internal usable space requirement
- Front and rear panel drawings
- Connector datasheets
- PCB drawing or mounting hole layout
- Heat source position and estimated power dissipation
- Material preference: 6063, 6061, steel, or hybrid
- Surface finish and color
- Logo and label method
- Sample quantity and batch quantity
- Packaging and export requirement
If a buyer does not yet have full drawings, photos, sketches, STEP files, or a marked-up PDF can still help the engineering team start the review.
Quality Control Before Batch Production
Before mass production, the first article or sample should be inspected against the approved drawing. For a custom rackmount chassis, inspection should include both mechanical fit and appearance.
Key QC points include:
- Rack ear alignment and mounting hole position
- Front panel cutout dimensions
- Connector fit test
- Panel flatness and visible surface quality
- Screw fit and thread quality
- Internal bracket location
- PCB mounting hole alignment
- Fan and vent opening position
- Finish color and logo location
- Packaging protection for front panels and corners
For repeat orders, keep an approved sample or sample inspection report. This creates a stable reference for future batches.
Why Work with PUMAYCASE for Custom Rackmount Chassis
PUMAYCASE is a China-based factory serving B2B buyers that need aluminum enclosures, tube extrusion enclosures, instrument chassis, 19 inch rackmount chassis, amplifier boxes, and CNC machined enclosure parts. For overseas OEM projects, the practical advantage is the ability to combine rackmount chassis manufacturing with custom CNC panels, surface finish, logo marking, and sample-to-batch production support.
For communication devices, industrial controllers, test equipment, power modules, and audio products, PUMAYCASE can help review drawings, suggest manufacturable panel designs, produce customized samples, and support repeat wholesale orders.
Conclusion
A successful 19 inch rackmount chassis project starts with more than the rack height. Buyers should define the rack format, internal clearance, front and rear panel cutouts, material, thermal design, internal support, rack ears, rails, finish, and quality inspection plan before production.
When these details are clear, the enclosure becomes a reliable mechanical platform for the electronics instead of a source of late-stage project risk. For OEM buyers, this means faster sampling, fewer revisions, better appearance consistency, and a smoother path to repeat production.
References
- International Electrotechnical Commission, IEC 60529: Degrees of protection provided by enclosures (IP Code).
- ASTM International, ASTM B221-21: Standard Specification for Aluminum and Aluminum-Alloy Extruded Bars, Rods, Wire, Profiles, and Tubes.
- Public overview of 19 inch rack dimensional conventions: 19-inch rack overview.